Friday, June 14, 2013
Paper Starhorse
Did this several years ago from a picture of a galaxy I found somewhere. Normal scissors, pasted onto a craft paper envelope with a glue stick. I think I was on my mission in Uruguay when I did this--I found it in a journal from around that time a few days ago.
There were a couple years (around sixth grade or so) when I did like, several of these cut-out animals or characters a day, including a seven foot mural that got put up in my elementary school's library that had every greek legend I could think of on it, with the exception of pegasus, who was probably on it at least three times... Cut out of printer paper, of course, probably when I was supposed to be doing math.
I've been feeling this urge to cut up things coming back recently, and I'm feeling like it'll probably be a Thing again within a few years if it's going where I think it is.
Tuesday, January 29, 2013
Psanky Horse
I've done real eggs before, and it's a time consuming but very rewarding at the end. It basically works through submerging the egg in a series of successive dyes, with a layer of carefully applied wax resist between each color. The wax is applied in thin lines using a tool called a kitska (I hope I'm spelling that right)
For instance, if you want white lines, you draw wax onto the blank egg the areas you want to make white, then, dip the entire egg in yellow. When the yellow is dry, you draw wax over everything you want to stay yellow, and dip into the red. Repeat, then orange, green, blue, purple, and finally black. Order of colors is important, as each dye completely covers the dye before it, but not vice versa.
After coming out of the black dye, your egg looks like a lumpy, blackish dirty-wax-colored, egg. You hold the egg near a candle and buff the wax off as it melts. This part is like watching magic as your design comes out. It's always a surprise to see what the thing actually looks like when all i said and done, as you can't see the color of your design as you go.
This piece is digital, but I tried to stay as true to process as I could. No eraser. I only allowed myself to attempt any given mark three times (a true purist wouldn't have any redo, whatsoever, but I justify it by saying my hands are much steadier on an actual egg than they are on my tablet...) I also named my layers for what color they'd be, then drew in monochrome, blacking out the canvas as I went. When the entire thing was 'waxed on' (except what I wanted to stay black, of course) I made a black fill layer beneath everything, then systematically filled in each layer with its color to see what I'd actually ended up doing. It looked like most peoples first psanky egg: awful. Determined to get a decent image anyway, I started doing what digital art does best: cheating. My main cheat before uploading here was I changed my mind on colors after I was done. (Well, after I decided this wasn't going to be my final bash at this particular process, I think I'll get a better one next time.) So, next time: No cheating at the end, now that I've had my test run.
Thursday, January 24, 2013
Fullfiling the Oath WIP's
I managed to save work in progress shots on a fairly regular basis, so I thought I'd share.
At this point I put it up for public critique.
I decided I wanted lines after all. Some giant photocopies and makeshift-light-table later, and voila! Lines.
Refining background sludge into actual trees and refining the color scheme a bit more.
Changing my mind a bit.
A very rough lay in of what I thought I wanted.
And before that was a sketch done during break on the back of a calendar. I'll see if I can dig that up and add it...not sure where it is right at the moment.
Thursday, August 16, 2012
As a kid, I ALWAYS wanted a horse. It was the top of my Christmas and birthday list every year since I can remember. Resources when I was younger didn't allow for either that, or for lessons, so I contented myself with hounding my few friends who had horses and admiring them from afar. I remember as a kid I had every horse on the way to my grandparents house memorized--it was a 45 minute drive, and there were more than a few to remember.
So, this is kind of a prover for 'patience conquers all.' Took about two decades longer than my child-self would have preferred, but perhaps better in the long run.
As a side note: she's only four. She was 'green broke' when I got her, meaning: she knows what a saddle feels like, has had someone on her a few times, and doesn't buck people off--usually. I kind of had a feeling it would be either really cool to train my own horse, or I'd end up in the hospital. I think I lucked out, because no hospital yet, though there's been a few fireworks along the way.
She's a stubborn, expensive little beast, but I love her.
Technical details: Ballpoint pen on the back of a fly-mask box (didn't have any paper with me at the time) That nifty background you see is from This lovely artist.
Wednesday, March 23, 2011
Woodcarving
Another ancient folk art: wood carving. It's pretty much what it sounds like, but there's a myriad of ways to carve wood, from chainsaw to chisel. Anything from large, rough hewn cuts to smooth polish can be achieved. A fun thing to work with on this image was trying to simulate how a wood gouge cuts with the grain, as well as some traditional patterns that have arisen from it, like the little notches along the tail and the mane. I also enjoyed simulating that high gloss finish, that sinks down into any ridges and catches the light. On real wood the finish can really sparkle and make the wood glow. Chris Pye
An example of a carved box
Windsor Wood Carving Museum
Bas Relief wood carvings
Wednesday, March 16, 2011
Embroidery
Embroidery is one of the older decorative arts, and has been practiced for centuries from Europe to China. It involves creating a design using colored thread on cloth, often with other pieces of colored cloth sewn on. Lots of different designs are possibly using different stitches, or combination of them. Embroidery can be done by hand, or on a machine, or a combination of both. This image mimics both machine and hand sewing techniques, but it's all digital.
The Bayeux Tapestry (Which is 20 inches tall and 231 feet long. Yes, feet.)
Chinese Embroidery
Azerbaijan embroidery
The Unicorn Tapestries at the Metropolitan Museum of Art
Monday, January 24, 2011
Woodblock Printing
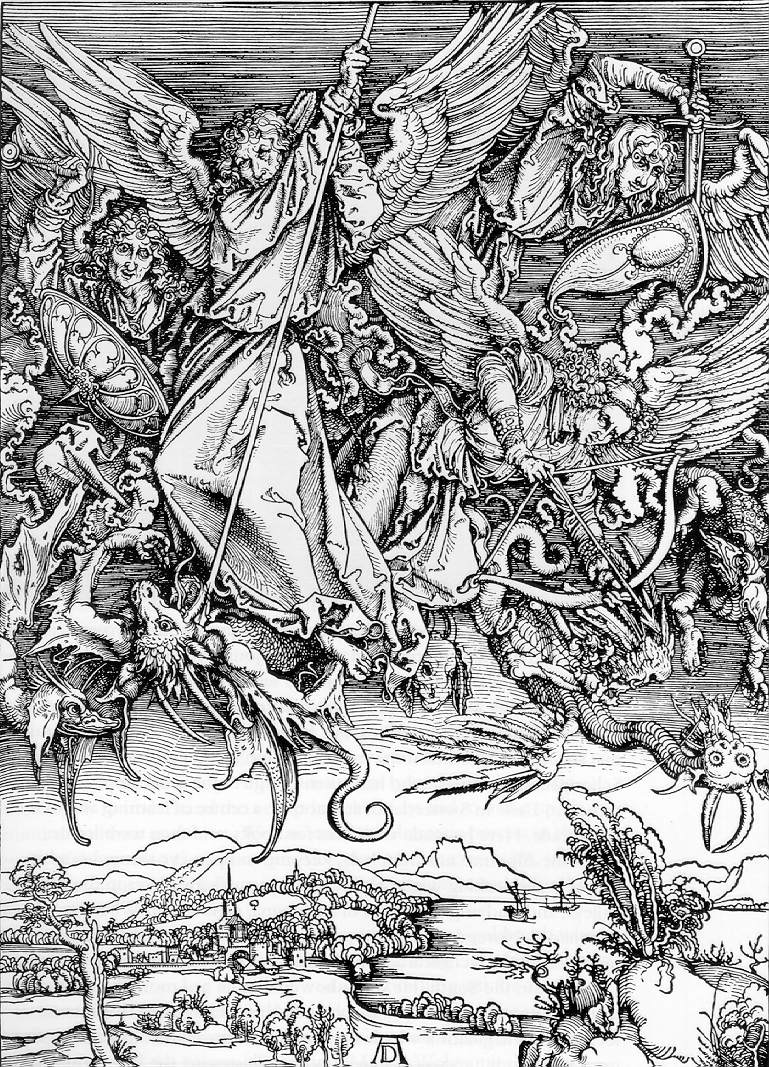
Woodblock printing is one of the oldest mediums used by 'illustrators' in that it could be mass produced. Almost as soon as the printing press was invented, woodblock illustrations found their way into the text as well, especially in religious manuscripts like this illustration by Albrecht Durer. Outside the Europe though, woodblocks had been in use for far longer, with recorded examples in China from at least 220 b.c. and even a few examples from ancient Egypt. The most famous examples of woodblock printing are the Japanese Ukiyo-e prints such as those by Utagawa Hiroshige.
Some contemporary artists that use woodblock printing are Tom Killion, Ralph Kiggell and the Brazilian folk artist José Borges.
Some interesting qualities of traditional woodblock prints are the texture the paint leaves on the paper surface, which can be effected by how much ink is used, paper thickness and tooth, how much pressure is applied, and other factors. Edges are usually bold, and their edges are different depending on what material they are carved into, whether it be linoleum block or actual wood. Even the grain direction of the wood has a bearing on edge quality: finer cuts can be made on an end-grain section of wood (sometimes called wood engraving) than can be on a normal plank. Different gouge widths and shapes can also be used for different line quality.
So here's my go at 'digital woodblock.' I had fun experimenting with the limitations of a three color run (on off white paper) rust, turquoise, and the black trap line. The turquoise over the rust gives the brown, simulating real, transparent printing ink.
Monday, April 14, 2008
Bridle Horse
The subject matter of this one was inspired by a halter in a Gerome painting of Arab Horsemen seen on James Gurney's blog (which I highly recommend). The entry it is from can be found here. Not completely captured, but it's such a beautiful halter I knew I had to draw it, at least in a practice piece. The rest of it was inspired by a broken ballroom company earring I found at work (which happens to be the dance department's costume shop) It was quite large (in the nature of most ballroom dance jewelry) and also quite glittery (also in the nature of ballroom jewelry) It was a Swarovsky crystal which was mostly cool blues and greens, with a good deal of gray if you could manage to not look at the sparkly parts, and every once in a while threw out an awesome orangey-red flare.